thread guide sewing machine
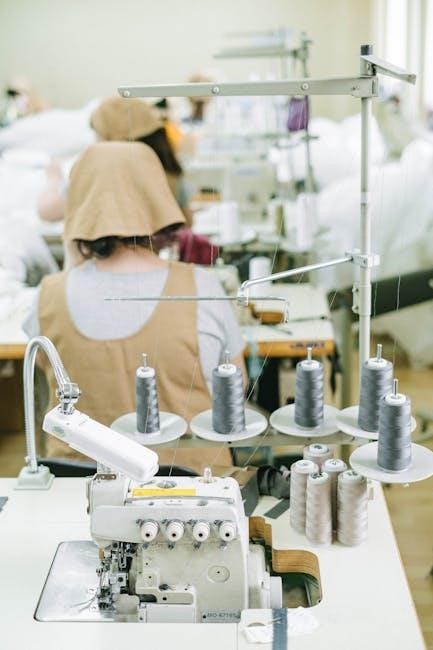
Thread guides are essential components on sewing machines that direct thread from the spool to the needle, ensuring smooth stitching and preventing tangles or knots. They are small but crucial for proper machine function.
1.1 What Are Thread Guides?
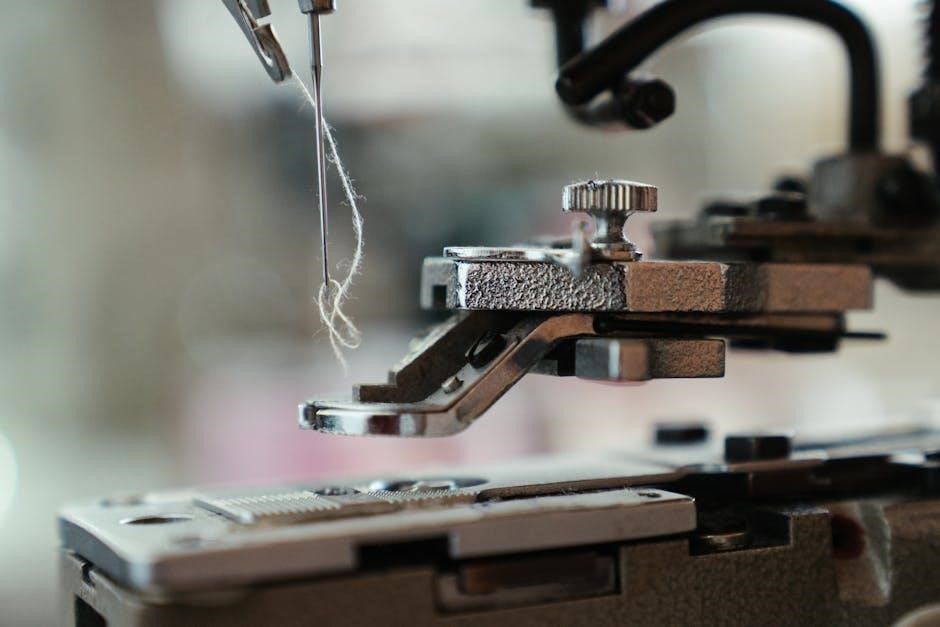
Thread guides are small, often metal or plastic components on sewing machines that direct the thread from the spool to the needle. They are strategically placed along the machine’s path to ensure the thread moves smoothly and evenly, preventing tangles or knots. These guides are essential for maintaining proper thread tension and alignment, which are critical for consistent stitching quality. They may also include tension discs to regulate thread flow.
1.2 The Purpose of Thread Guides
Thread guides ensure the thread moves smoothly from the spool to the needle, preventing tangles and knots. They maintain consistent thread tension, essential for even stitching. By directing the thread precisely, they help achieve high-quality stitches, reduce breakage, and enhance sewing efficiency. Properly aligned guides are vital for optimal machine performance, ensuring fabric handling and stitch formation remain consistent across various projects and fabric types.
The Importance of Proper Threading
Proper threading prevents tangles, ensures smooth stitching, and avoids machine damage. It guarantees consistent stitch quality and optimal sewing performance. Correct threading is essential for trouble-free sewing experiences.
2.1 How Thread Guides Ensure Smooth Stitching
Thread guides play a pivotal role in maintaining consistent thread tension and alignment. By directing the thread from the spool to the needle, they prevent tangling and knotting, ensuring uniform stitch formation. Properly aligned guides minimize thread drag, reducing the risk of breakage and maintaining fabric feed consistency. This results in smooth, even stitching and enhances overall sewing efficiency, making them indispensable for high-quality results.
2.2 Consequences of Improper Threading
Improper threading can lead to tangled threads, uneven stitching, and frequent needle breakage. Misaligned or skipped thread guides may cause the thread to loop or knot excessively, damaging fabric. Additionally, incorrect tension can result in loose stitches or machine jams, halting productivity. Such issues necessitate re-threading and may require professional repair if internal components are affected, emphasizing the importance of precise threading techniques for seamless operation and project success.
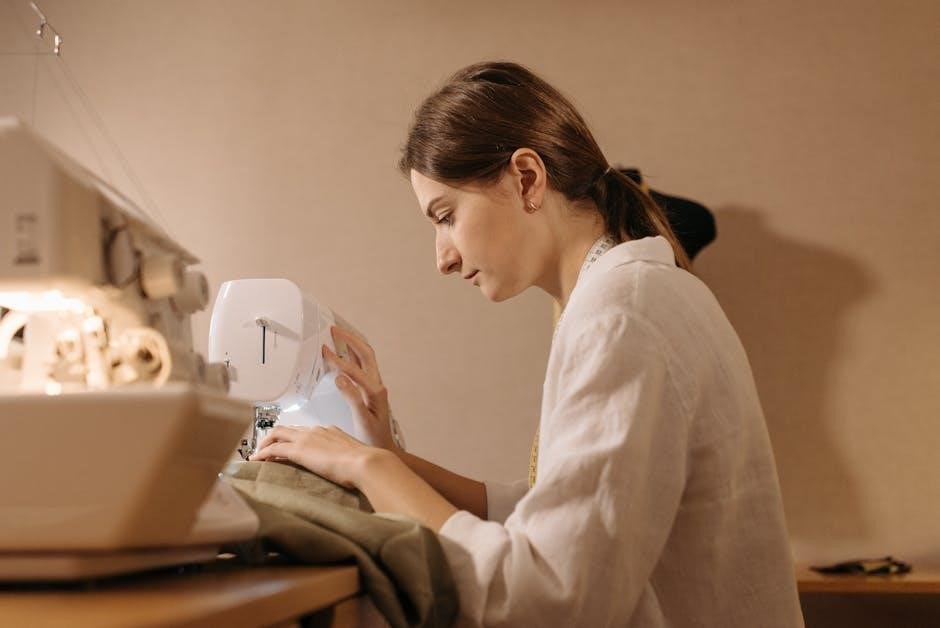
Step-by-Step Guide to Threading Your Sewing Machine
Place the thread on the spool pin, follow the machine’s thread guides, adjust tension, and carefully insert the thread into the needle for smooth operation.
3.1 Preparing the Machine
Before threading, turn off and unplug the machine for safety. Raise the take-up lever and ensure the presser foot is in the upward position. Remove any leftover thread or debris from previous use. Check the machine’s manual for specific preparation steps, as some models may require additional adjustments. Proper preparation ensures smooth threading and prevents issues like skipped stitches or thread breakage.
3.2 Placing the Thread on the Spool Pin
Gently place the spool of thread onto the spool pin, ensuring it sits securely. If the pin is horizontal, slide the spool on until it fits snugly. For vertical pins, press the spool down firmly. Ensure the thread unwinds smoothly in the correct direction, as indicated by the spool’s label. Proper placement prevents tangling and ensures the thread flows freely through the machine. Always refer to your machine’s manual for specific spool pin orientation.
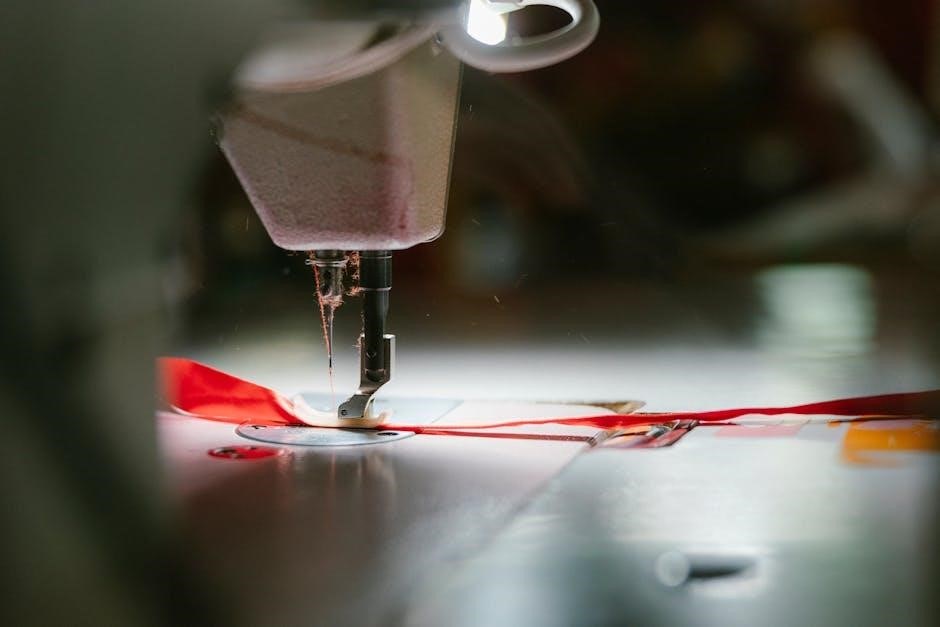
3.3 Navigating the Thread Through Guides
After securing the thread on the spool pin, gently guide it through each thread guide on the machine. Follow the arrows or marks indicated on the machine to ensure the thread moves correctly from the spool to the tension discs. Use the take-up lever to help direct the thread smoothly around each guide. Properly winding the thread through these guides ensures even tension and prevents tangles, allowing the thread to flow seamlessly to the needle for consistent stitching.
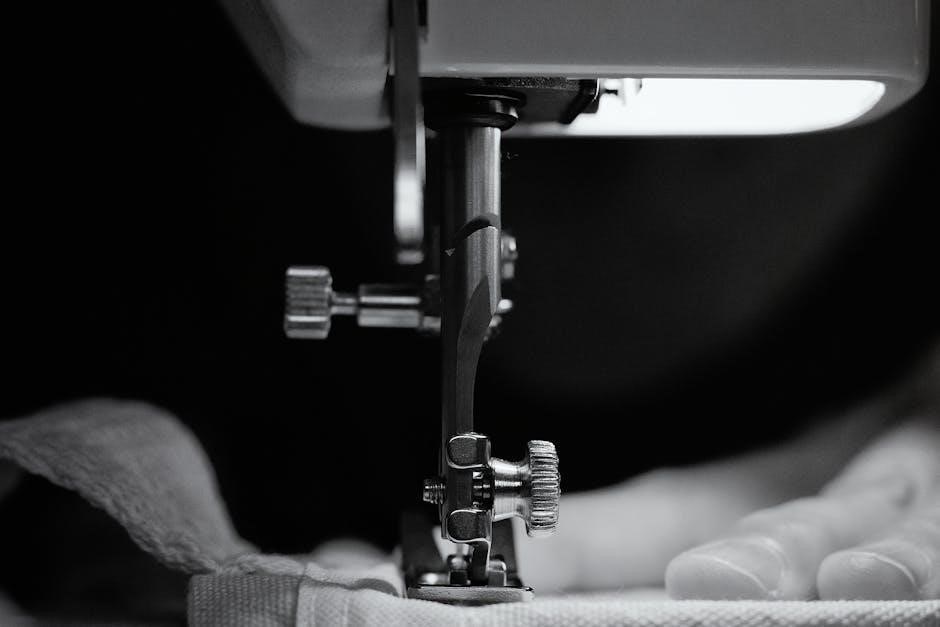
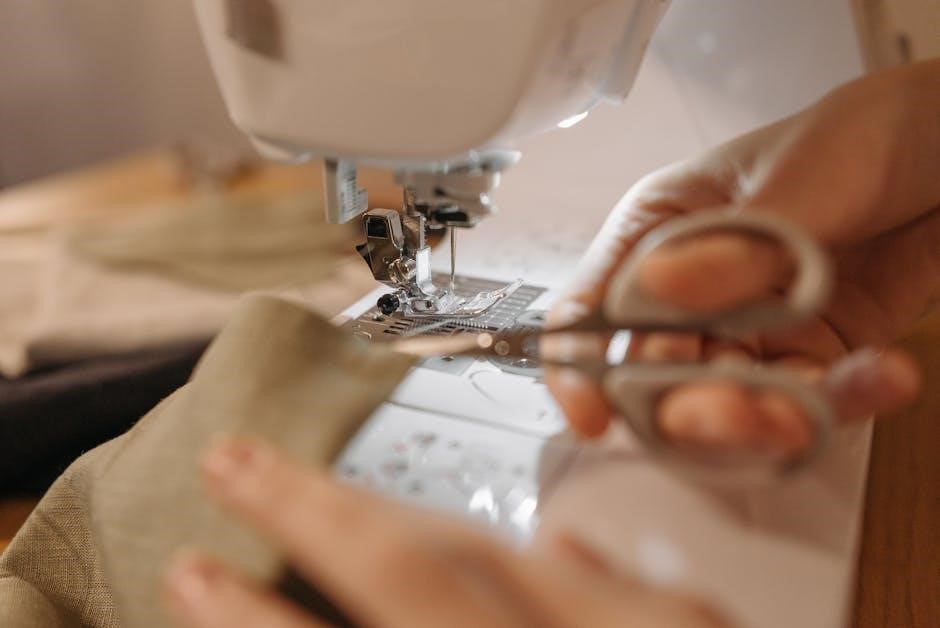
3.4 Inserting the Thread into the Needle
Once the thread has passed through all the guides and tension discs, carefully insert the end into the sewing machine’s needle. Use a magnifying tool or good lighting to see the needle’s eye clearly. Gently pull the thread until it is seated properly. Ensure the thread is not twisted or tangled before sewing. Proper insertion guarantees smooth stitching and prevents thread breakage during operation.
Common Mistakes to Avoid While Threading
Common mistakes include incorrect thread placement, missing guides, or improper tension, causing tangles or breakage. Always follow the manual for accurate threading.
4.1 Incorrect Placement of the Thread
Incorrect placement of the thread is a common mistake that can lead to tangles, knots, or even needle breakage. Ensure the thread is properly seated in the spool pin and follows the machine’s guide path. Misplacement can cause uneven tension or thread slipping, disrupting the stitching process. Always refer to the manual for correct placement to avoid such issues and ensure smooth operation.
4.2 Skipping Essential Thread Guides
Skipping essential thread guides can disrupt the thread’s path, causing poor stitch quality or machine malfunction. Each guide ensures proper thread alignment and tension. Neglecting them may lead to loose threads, uneven stitching, or even needle breakage. Always follow the manufacturer’s threading diagram to navigate the thread through all designated guides, maintaining consistent tension for optimal performance and preventing potential damage to your sewing machine.
Choosing the Right Thread for Your Sewing Machine
Selecting the correct thread for your sewing machine is crucial for optimal performance. Match thread type and weight to your fabric, ensuring compatibility and durability for seamless stitching.
5.1 Understanding Thread Types and Weights
Understanding thread types and weights is vital for successful sewing. Threads vary in material, such as cotton, polyester, or blends, each suited for different fabrics. Weight refers to thickness, with heavier threads for dense materials and lighter for delicate ones. Choosing the right type and weight ensures proper tension and stitch quality, preventing breakage and enhancing your sewing machine’s performance.
5.2 Matching Thread to Fabric Type
Matching the thread to the fabric type is crucial for optimal sewing results. Cotton threads are ideal for natural fabrics like cotton and linen, while polyester or blends work well for synthetic materials. Heavy-duty threads are best for thick fabrics like denim or canvas. Delicate fabrics, such as silk or chiffon, require lightweight, specialized threads. Proper thread-to-fabric pairing ensures strong stitches, prevents breakage, and enhances the overall quality of your sewing projects.
Maintaining and Cleaning Thread Guides
Regular cleaning of thread guides prevents thread tangles and ensures smooth operation. Use a soft brush or compressed air to remove lint and debris. Lubricate moving parts as needed to maintain functionality and extend the life of your sewing machine.
6.1 Regular Cleaning Routine
A regular cleaning routine for thread guides involves using a soft-bristled brush or compressed air to remove accumulated lint and debris. This prevents thread from tangling and ensures smooth stitching. Additionally, gently wiping the guides with a cotton swab dipped in mild detergent can help eliminate oil residue and dirt buildup. Regular maintenance extends the lifespan of the machine and maintains optimal performance. Consistency is key to avoiding operational issues.
6.2 Lubricating Moving Parts
Lubricating the moving parts of your sewing machine, including thread guides, is crucial for ensuring smooth operation. Use a few drops of sewing machine oil on the tension discs and take-up lever regularly. Avoid over-lubrication, as excess oil can attract lint and dust, leading to maintenance issues. Proper lubrication reduces friction, preventing wear and tear on the machine’s components. Perform this maintenance every 1-2 months or as recommended in your machine’s manual for optimal performance.
Troubleshooting Common Threading Issues
Common threading issues include thread breakage and uneven tension. Check for misaligned guides, tangled thread, or improper spool placement. Clean and adjust components as needed for smooth operation.
7.1 Diagnosing Thread Breakage
Thread breakage often occurs due to improper tension, tangled thread, or misaligned guides. Check the thread path for twists, ensure the spool is correctly placed, and verify that the thread is not caught on any sharp edges. Adjust tension discs and clean guides to prevent friction. Using high-quality thread suitable for your machine can also minimize breakage issues during sewing.
7.2 Adjusting Tension for Optimal Threading
Proper thread tension is crucial for seamless stitching. To adjust tension, start by threading the machine and pulling the thread gently. If it feels too tight or loose, tweak the tension discs. For most fabrics, a balanced tension ensures even stitching. Refer to your machine’s manual for specific guidance, as settings may vary between models. Correct tension prevents thread breakage and enhances overall sewing performance.
Threading Variations Across Sewing Machine Types
Threading processes differ across sewing machine types, with mechanical, computerized, and overlockers requiring specific techniques. Each type has unique thread guides and paths to ensure proper stitching.
8.1 Threading a Mechanical Sewing Machine
Threading a mechanical sewing machine involves placing the thread spool on the pin, following the machine’s thread path, and ensuring proper tension. Guides direct the thread through take-up levers, tension discs, and finally, the needle. Mechanical machines often use clear diagrams or arrows to indicate the threading route. Proper alignment and following the manufacturer’s instructions are crucial to avoid thread breakage and ensure smooth stitching. Always refer to the manual for specific guidance.
8.2 Threading a Computerized Sewing Machine
Threading a computerized sewing machine is often streamlined with automated features. Begin by placing the thread on the spool pin and gently pulling it through the machine’s digital guides. Some models have automatic threading options, while others require manual navigation through marked pathways. Ensure the thread passes through tension discs and take-up levers before inserting it into the needle. Refer to the machine’s touchscreen or manual for specific guidance, as computerized models may have unique threading sequences.
8.3 Threading an Overlocker or Serger
Threading an overlocker or serger involves carefully guiding threads through multiple loops and tension discs. Start by cutting the thread tails and inserting them into the machine’s guides, following the color-coded paths. Use the threading tool to pass each thread through the respective loops and tension discs. Ensure the thread is seated properly in the tension discs before pulling gently to set the tension. Consult the manual for specific threading sequences, as sergers typically handle multiple threads simultaneously.
Accessories That Enhance Threading Efficiency
Accessories like thread stands, spool holders, and thread nets improve threading efficiency by stabilizing the thread, reducing tangles, and maintaining consistent tension during the stitching process.
9.1 Thread Stands and Spool Holders
Thread stands and spool holders are invaluable accessories that enhance threading efficiency. They stabilize the thread spool, preventing it from rolling or tangling. Adjustable stands accommodate different spool sizes, ensuring smooth thread flow. By keeping the thread organized, these accessories reduce the risk of knots and twists, allowing for uninterrupted sewing. They are particularly useful for large or specialty threads, making them a must-have for both home and industrial sewing setups.
9.2 Thread Nets and Tension Aids
Thread nets and tension aids are designed to enhance control over thread movement. Thread nets prevent excessive twist and tangling, especially with delicate or specialty threads. Tension aids adjust thread tightness, ensuring even flow and reducing stitching issues like puckering or loose seams. These tools work in tandem with thread guides to maintain consistency and prevent thread breakage, making them indispensable for precise and professional sewing results.
Tips for Threading Different Types of Projects
Adapt threading techniques based on fabric type and thread weight. Use thread nets for delicate threads and tension aids for heavier fabrics to ensure smooth stitching and avoid tangles.
10.1 Threading for Heavy-Duty Fabrics
For heavy-duty fabrics, use sturdy threads like polyester or cotton-wrapped polyester. Place the spool on the pin, wind the bobbin tightly, and guide the thread through all guides. Ensure proper tension to prevent breakage. Use a thread stand for large spools of heavy thread. Avoid tangling by managing thread twist and keeping the path smooth. This ensures strong, consistent stitches for thick materials like denim or canvas.
10.2 Threading for Delicate or Specialty Fabrics
For delicate fabrics like silk or chiffon, use lightweight threads and a sharp needle. Gently place the spool on the pin, wind the bobbin loosely, and carefully guide the thread through each guide to avoid tension. Use a thread net for clear or specialty threads. Adjust tension discs to maintain light pressure, preventing fabric damage. This ensures smooth stitching and protects fragile materials from tearing or puckering during the sewing process.
Preventing Thread Tangles and Knots
Use a thread stand for even unwinding, and a thread net for slippery threads. Properly wind bobbins and avoid over-tightening to prevent tangles and knots during sewing.
11.1 Proper Winding of the Bobbin
Properly winding the bobbin is crucial for smooth sewing. Use the bobbin winder, ensuring the thread aligns with the guide. Avoid over-winding, as this can cause thread to twist. Keep the thread taut but not overly tight. Once wound, cut the thread and insert the bobbin into its case, ensuring it spins freely without tangling. This prevents knots and ensures consistent stitching quality.
11.2 Managing Thread Twist and Tension
Proper thread twist and tension are vital for smooth sewing. Excessive twist can cause puckering or uneven stitches, while incorrect tension leads to loose or tight threading. Use the tension discs to adjust the thread’s tightness, ensuring it flows evenly through the guides. Maintain consistent thread flow by gently pulling the thread after each guide. This ensures balanced stitching and prevents tangles or breakage during the sewing process.
The Role of Tension in Threading
Thread tension is crucial for proper thread flow. Tension discs regulate thread tightness, preventing tangles and ensuring smooth stitching. Correct tension is key for optimal sewing performance.
12.1 Understanding Tension Discs
Tension discs are critical components in sewing machines that regulate thread tightness. They apply even pressure to the thread, ensuring smooth flow and preventing tangles. Proper adjustment of these discs is essential for maintaining consistent stitch quality. Incorrect tension can lead to loose stitches or thread breakage, emphasizing the importance of understanding and correctly setting these discs for optimal sewing performance.
12.2 Adjusting Tension for Different Fabrics
Adjusting thread tension is vital for sewing various fabrics. Heavy-duty fabrics like denim require higher tension to prevent loose stitches, while delicate fabrics like silk need lower tension to avoid tearing. Always test tension on a scrap fabric piece before sewing to ensure optimal results. Proper tension adjustment ensures even stitching and prevents fabric damage, making it a critical step for achieving professional-looking seams.
Comparing Thread Guides Across Different Brands
Thread guides vary by brand, with Singer offering standardized designs and Brother featuring versatile, adjustable guides. Both ensure smooth threading but cater to different machine types and user preferences.
13.1 Singer vs. Brother Thread Guides
Singer and Brother thread guides differ in design and functionality. Singer thread guides are known for their simplicity and durability, often featuring a straightforward path for the thread. Brother thread guides, while similar, incorporate adjustable spring-plate mechanisms that enhance flexibility for various thread types. Both brands prioritize smooth stitching, but Brother’s adaptability makes it a favorite for versatile sewing projects, whereas Singer’s reliability appeals to traditionalists seeking consistent performance.
13.2 Industrial vs. Domestic Machine Thread Guides
Industrial and domestic sewing machines have distinct thread guides tailored to their usage. Industrial machines feature robust, heavy-duty thread guides designed for high-speed operation and thick, heavy-duty fabrics. Domestic machines, while less durable, offer more versatility with adjustable thread guides suitable for various thread types and fabrics. These differences reflect the specific demands of each machine type, ensuring optimal performance in their respective environments;
The Future of Thread Guides in Sewing Technology
Future thread guides may feature automatic threading systems and smart sensors, enhancing efficiency and reducing errors for sewists of all levels with real-time adjustments and optimize thread tension dynamically.
14.1 Innovations in Automatic Threading
Innovations in automatic threading are revolutionizing sewing, with systems that streamline the process, reducing manual effort and errors. Smart sensors detect thread issues, while automated tension adjustment ensures optimal sewing. Advanced machines now feature touchscreens and voice commands, guiding users through threading step-by-step. These innovations make sewing more accessible and efficient, catering to both beginners and professionals by minimizing setup time and maximizing productivity.
14.2 Smart Thread Guides and Sensors
Smart thread guides and sensors represent cutting-edge advancements in sewing technology, enhancing precision and efficiency. These sensors detect thread misalignment, tangles, or improper tension, alerting users instantly. Advanced algorithms adjust threading paths dynamically, minimizing errors. Real-time monitoring ensures optimal thread flow, reducing downtime and improving stitch quality. Such innovations cater to both novice and experienced sewers, offering a seamless and intuitive sewing experience tailored to diverse fabric types and projects.
Mastering thread guides is key to seamless sewing. Proper threading ensures smooth stitching, avoids tangles, and extends machine longevity. Regular maintenance and quality threads enhance performance.
15.1 Summary of Key Points
Thread guides are crucial for directing thread from the spool to the needle, ensuring smooth stitching and preventing tangles. Proper threading techniques, following manufacturer guidelines, and using the right thread type are essential. Regular maintenance, such as cleaning and lubricating guides, extends machine life. Understanding tension adjustments and avoiding common mistakes like skipped guides or incorrect thread placement enhances sewing efficiency. Mastering these elements ensures optimal performance and professional-grade results.
15.2 Final Tips for Mastering Thread Guides
Mastering thread guides requires patience and practice. Always follow the machine’s manual for specific guidance. Use high-quality threads suited to your fabric and machine type. Regularly clean and maintain guides to ensure smooth operation. Adjust tension carefully to avoid thread breakage. Practice threading on scrap fabric before starting projects. With time and attention to detail, you’ll achieve professional results and enjoy a seamless sewing experience.